JRH93 5 inch 38 open gun mount 1/96
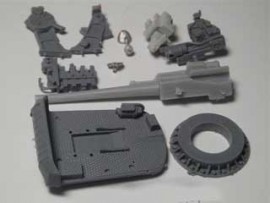
Construction Guide:This is JRH 93 the USN 5"/38 gun assembly guide.(Click on the thumbnail pictures above. Hover the mouse towards the top left or right of the picture when it opens, to move on to the next picture or back to the previous one.)1. All the parts in the kit.2. Fit the base ring to the base and drill out all the holes indicated for the control and fuse setting parts with a 1.4mm drill, but not the central trunnion fixing holes.3. Drill out the trunnion fixing holes with a 1mm drill and the barrel pivot holes with a 2mm drill. Cut approx 1/16"off the end of the LH trunnion [when sitting on the gun] forward projecting elevation gear quadrant to enable the forward control column to fit. Whilst fitting the two trunnion pieces, also fit the resin barrel after shortening the pivot stubs. Dry-fit to ensure that the barrel points exactly forward and both trunnions are upright. This may take several adjustments to get right4. Drill out the LH seat with a 1.4mm drill and fit to fuse setter block angled rod. Take the seat with the conical base and after drilling out the RH control column 1.4mm where shown, fit this seat.5. Fit the forward control column as shown. This must not interfere with the elevating quadrant - see 3.6. Fit the LH fuse setter block as shown.7. Fit the RH control column where shown.8/9. The finished gun. A rear safety rail can be fitted but this is not supplied.