Viewing products
All the products are shown here. Click on any of the categories or sub-categories to see products in that category. To move to a different category UNTICK your original choice and then tick your new choice.Search
If you are searching for a specific part by JRH number, please put just the number into the search box, i.e. "254". Please be aware that some numbers will bring up other fittings too, i.e. "96" will also bring up products of 1/96 scale.Fittings list pictures
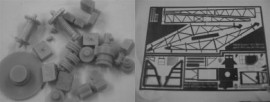
JRH876 1/96 RN Aircraft crane kit
Construction:a: Start of Assembly ------ Fit together the side framesto the base.b: Make sure to fit the pivot re-inforcing tabs when sliding the front panel back at an angle.c: Fold up the top tray and attach to crane base at the top of the left hand side.d: Fit the two top tray supporting brackets.e: Spring fit the two white-metal drums where shown and glue on the resin parts shown in the picture . To get good adhesion lightly run the brass with fine sandpaper before fixing.f: Another view of previous step.g: Fit the back panel. You will need to trim the locating tabs a little to get the back on.h: Fit the other base parts as shown.i: Fit the top tray with the textured floor.j: fit the top tray gear.k: Cut out the Jib parts and when assemblingfix the RH side piece to the top piece which is the shorter of the two [top and bottom].l: Remember that with PE the half-etched line is Bend to Close.m: Bend the bottom piece as shown.n: Drill all 5 pulley assembles [ 2 single/2 double and 1 four pulley ] with 1mm drill all the way through and the two double ones shown are fittedas shown.o: The central 4 pulley assembly must be fitted by drilling a new 1mm hole at the bottom of the side frame where shown and not at the existing hole.p: The final product.